Difference between revisions of "Connecting to WCSNET"
(→Windows 7) |
|||
| Line 3: | Line 3: | ||
== Windows 8 == | == Windows 8 == | ||
== Windows 7 == | == Windows 7 == | ||
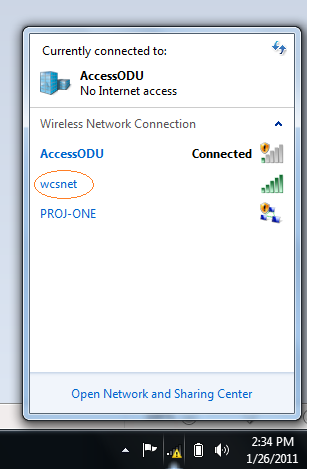
| + | As show on the Picture 1 below - click on the wireless icon located on the bottom left right side of the screen.You should see the list of available wireless networks.Choose the one named 'wcsnet' and right click on it and select 'Properties'. If you don't see the wcsnet there - you will have to add a new wireless connection.When you add a new connection - you should put the properties explained below. | ||
| + | |||
| + | [[File:windows_wireless_1.png]] | ||
| + | |||
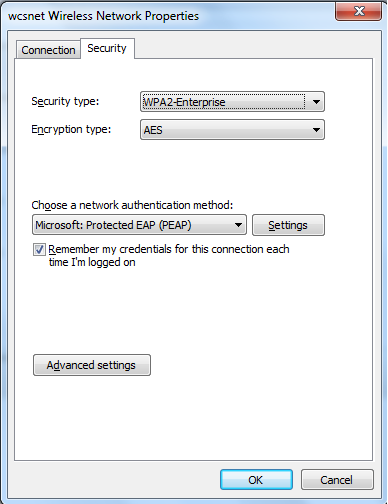
| + | After you see the 'Properties' of the 'wcsnet' - 'Security' property should be the same as shown on the picture 2 below. | ||
| + | |||
| + | [[File:windows_wireless_2.png]] | ||
| + | |||
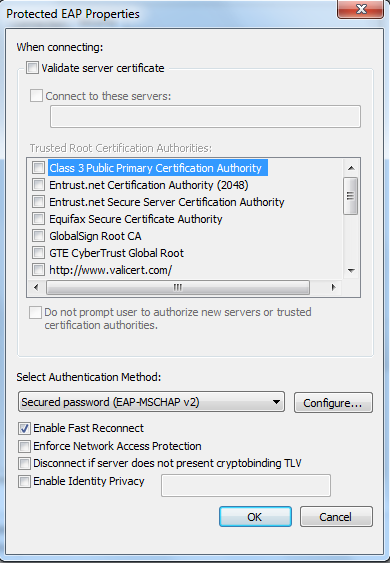
| + | After making sure the settings for the Security tab of the wireless connections are correct - click on the 'Settings' button. 'Settings' button is located next to the 'Choose a network authentication method' shown on Picture 2. When the 'Settings' window pops up - make sure the settings are the same as shown on the picture below and make sure that the 'Validate Server Certificate' is unchecked. | ||
| + | |||
| + | [[File:windows_wireless_3.png]] | ||
| + | |||
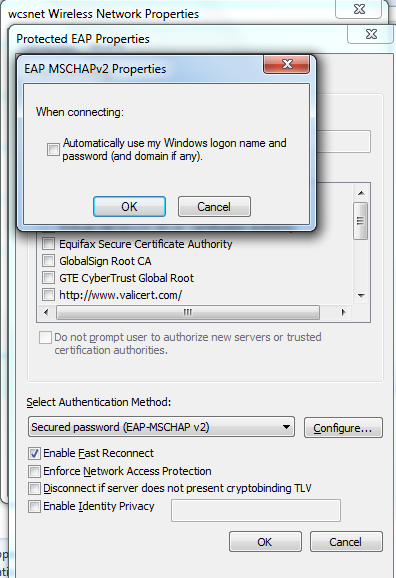
| + | On the 'Settings' window click 'Configure' button located next to 'Select Authentication Method' as shown on the above Picture 3. On the new 'Configure' window - make sure that the 'Automatically use my Windows logon name and password' is unchecked as shown on the Picture 4 below. | ||
| + | |||
| + | [[File:windows_wireless_4.png]] | ||
| + | |||
| + | Click 'OK' on that window and all the subwindows and close the Wireless Properties. Now click 'Connect' or double click on the 'wcsnet' wireless icon and it should ask you for your credentials. Put your CS Windows account credentials and you should be able to connect to 'wcsnet'. | ||
| + | |||
| + | If you still experience issues - please email [mailto:root@cs.odu.edu root@cs.odu.edu] | ||
| + | |||
== Windows Vista == | == Windows Vista == | ||
== Windows XP == | == Windows XP == | ||
== Mac OS X == | == Mac OS X == | ||
Revision as of 23:31, 19 March 2014
The CS Department provides a high speed wireless network for CS students. You can access this network in the Dragas Building as well as the Engineering and Computational Sciences Building. The name of the network is wcsnet. Below are instructions to connect using various operating systems.
Windows 8
Windows 7
As show on the Picture 1 below - click on the wireless icon located on the bottom left right side of the screen.You should see the list of available wireless networks.Choose the one named 'wcsnet' and right click on it and select 'Properties'. If you don't see the wcsnet there - you will have to add a new wireless connection.When you add a new connection - you should put the properties explained below.
After you see the 'Properties' of the 'wcsnet' - 'Security' property should be the same as shown on the picture 2 below.
After making sure the settings for the Security tab of the wireless connections are correct - click on the 'Settings' button. 'Settings' button is located next to the 'Choose a network authentication method' shown on Picture 2. When the 'Settings' window pops up - make sure the settings are the same as shown on the picture below and make sure that the 'Validate Server Certificate' is unchecked.
On the 'Settings' window click 'Configure' button located next to 'Select Authentication Method' as shown on the above Picture 3. On the new 'Configure' window - make sure that the 'Automatically use my Windows logon name and password' is unchecked as shown on the Picture 4 below.
Click 'OK' on that window and all the subwindows and close the Wireless Properties. Now click 'Connect' or double click on the 'wcsnet' wireless icon and it should ask you for your credentials. Put your CS Windows account credentials and you should be able to connect to 'wcsnet'.
If you still experience issues - please email root@cs.odu.edu


