Difference between revisions of "Remote Access for Z Drives"
From Systems Group
| Line 7: | Line 7: | ||
#:[[File:Windows-Z_Drive-Step_1.png | border]] | #:[[File:Windows-Z_Drive-Step_1.png | border]] | ||
#:<br> | #:<br> | ||
| − | # Type the network | + | # Type the network path (folder) of your drive, select “Connect using different credentials,” and click “Finish.” If you don’t know the network path of your drive, see the table below. Be sure to replace “username” with your CS username: |
#:[[File:Windows-Z_Drive-Step_2.png | border]] | #:[[File:Windows-Z_Drive-Step_2.png | border]] | ||
#: <br> | #: <br> | ||
| Line 20: | Line 20: | ||
==== CIFS ==== | ==== CIFS ==== | ||
Note that this method will require super user privileges. If you are not a privileged user, see SSHFS below. | Note that this method will require super user privileges. If you are not a privileged user, see SSHFS below. | ||
| − | # Install the cifs-utils package from your distribution's package manager | + | # Install the <code>cifs-utils</code> package from your distribution's package manager |
| − | # | + | # Create a directory to mount the share over: |
| + | #: <pre>$ sudo mkdir /media/zdrive</pre> | ||
| + | # Mount the share using your network path from the table below. For example: | ||
| + | #: <pre>$ sudo mount -t cifs -o username=username,uid=$(id -u) //cifs-dgs.cs.odu.edu/Undergrad/username /media/zdrive</pre> | ||
| + | # To unmount the share: | ||
| + | #: <pre>$ sudo umount /media/zdrive</pre> | ||
==== SSHFS ==== | ==== SSHFS ==== | ||
| − | # Install sshfs from your distribution's package manager | + | # Install <code>sshfs</code> from your distribution's package manager |
| − | # | + | # Create a directory to mount the share over: |
| + | #: <pre>$ mkdir ~/zdrive</pre> | ||
| + | # Mount the share; rather than use a network path, SSHFS uses a server followed by the directory's path on that server. For example: | ||
| + | #: <pre>$ sshfs username@linux.cs.odu.edu:/home/username ~/zdrive</pre> | ||
| + | # To unmount the share: | ||
| + | #: <pre>$ fusermount -u ~/zdrive</pre> | ||
== MacOS == | == MacOS == | ||
# From the Go menu, select "Connect to Server" | # From the Go menu, select "Connect to Server" | ||
| − | # Type in your network | + | # Type in your unix network path from the table below prepended by <code>smb:</code>For example: |
| − | #: <pre | + | #: <pre>$ smb://cifs-dgs.cs.odu.edu/Undergrad/username</pre> |
| − | == Network | + | == Network paths == |
| − | {| class="wikitable" style="width: | + | {| class="wikitable" style="width:800px; border:0px; cellpadding:2px; cellspacing:2px;" |
|- | |- | ||
| − | ! Account type !! | + | ! Account type !! Windows network path !! Unix network path (cifs) |
|- | |- | ||
| − | | Undergraduate || \\cifs-dgs.cs.odu.edu\Undergrad\username | + | | Undergraduate || \\cifs-dgs.cs.odu.edu\Undergrad\<code>username</code> || //cifs-dgs.cs.odu.edu/Undergrad/<code>username</code> |
|- | |- | ||
| − | | Graduate || \\cifs-ecs.cs.odu.edu\Grad\username | + | | Graduate || \\cifs-ecs.cs.odu.edu\Grad\<code>username</code>|| //cifs-ecs.cs.odu.edu/Grad/<code>username</code> |
|- | |- | ||
| − | | Staff || \\cifs-dgs.cs.odu.edu\Staff\username | + | | Staff || \\cifs-dgs.cs.odu.edu\Staff\<code>username</code>|| //cifs-dgs.cs.odu.edu/Staff/<code>username</code> |
|- | |- | ||
| − | | Faculty || \\cifs-ecs.cs.odu.edu\Faculty\username | + | | Faculty || \\cifs-ecs.cs.odu.edu\Faculty\<code>username</code>|| //cifs-ecs.cs.odu.edu/Faculty/<code>username</code> |
|} | |} | ||
Be sure to replace "username" with your computer science username. | Be sure to replace "username" with your computer science username. | ||
Revision as of 20:16, 14 April 2020
In progress
Windows
- Connect to the CS VPN. Instructions on doing so can be found here.
- Open Windows File Explorer either by right clicking the “Start” button and selecting “File Explorer” or by pressing
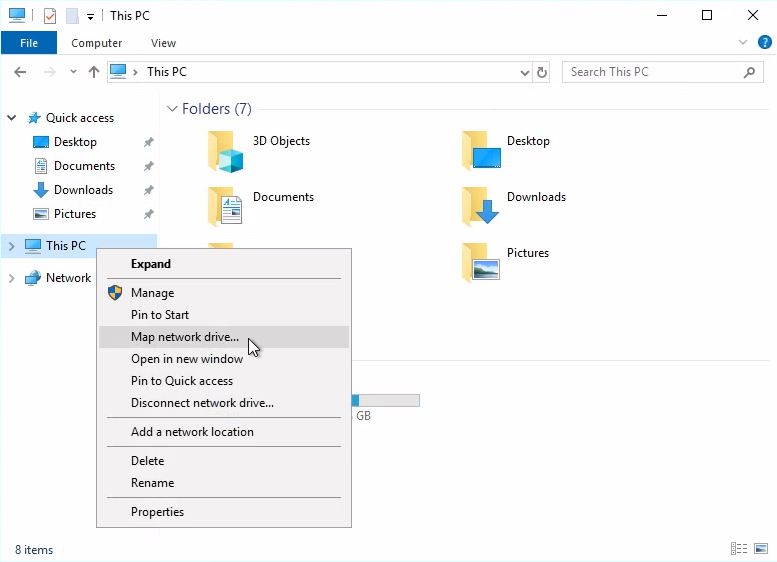
⊞WIN + E - Right click “This PC” and select “Map network drive…”
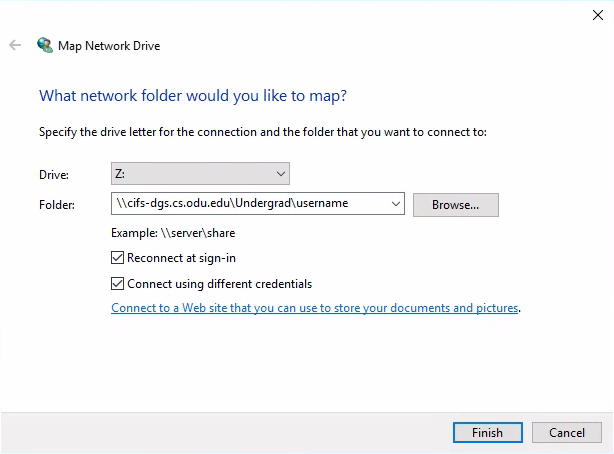
- Type the network path (folder) of your drive, select “Connect using different credentials,” and click “Finish.” If you don’t know the network path of your drive, see the table below. Be sure to replace “username” with your CS username:
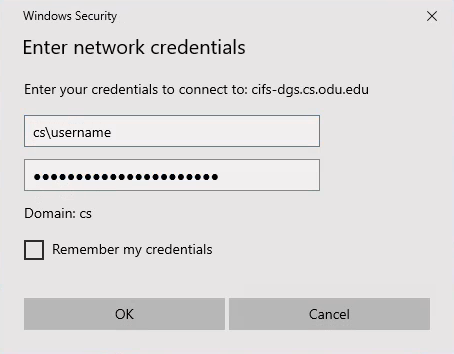
- Enter your CS account credentials prepended by “cs\” and click “OK”
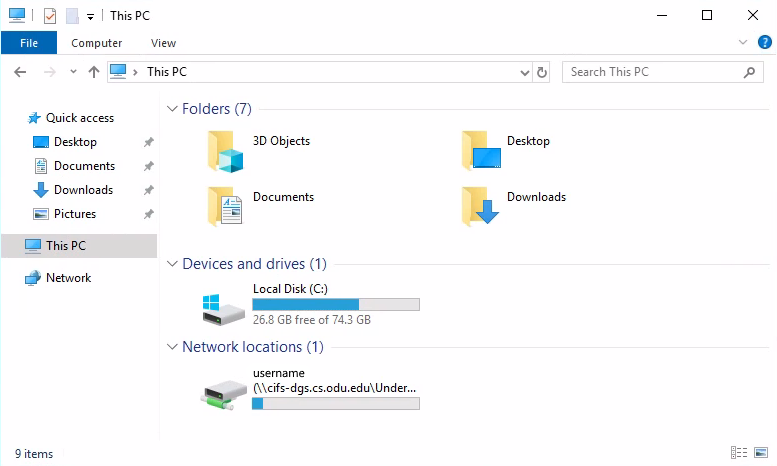
- Your Z drive should now be connected. Note that it will not be available if you disconnect from the VPN.
Linux
CIFS
Note that this method will require super user privileges. If you are not a privileged user, see SSHFS below.
- Install the
cifs-utilspackage from your distribution's package manager - Create a directory to mount the share over:
-
$ sudo mkdir /media/zdrive
-
- Mount the share using your network path from the table below. For example:
-
$ sudo mount -t cifs -o username=username,uid=$(id -u) //cifs-dgs.cs.odu.edu/Undergrad/username /media/zdrive
-
- To unmount the share:
-
$ sudo umount /media/zdrive
-
SSHFS
- Install
sshfsfrom your distribution's package manager - Create a directory to mount the share over:
-
$ mkdir ~/zdrive
-
- Mount the share; rather than use a network path, SSHFS uses a server followed by the directory's path on that server. For example:
-
$ sshfs username@linux.cs.odu.edu:/home/username ~/zdrive
-
- To unmount the share:
-
$ fusermount -u ~/zdrive
-
MacOS
- From the Go menu, select "Connect to Server"
- Type in your unix network path from the table below prepended by
smb:For example:-
$ smb://cifs-dgs.cs.odu.edu/Undergrad/username
-
Network paths
| Account type | Windows network path | Unix network path (cifs) |
|---|---|---|
| Undergraduate | \\cifs-dgs.cs.odu.edu\Undergrad\username |
//cifs-dgs.cs.odu.edu/Undergrad/username
|
| Graduate | \\cifs-ecs.cs.odu.edu\Grad\username |
//cifs-ecs.cs.odu.edu/Grad/username
|
| Staff | \\cifs-dgs.cs.odu.edu\Staff\username |
//cifs-dgs.cs.odu.edu/Staff/username
|
| Faculty | \\cifs-ecs.cs.odu.edu\Faculty\username |
//cifs-ecs.cs.odu.edu/Faculty/username
|
Be sure to replace "username" with your computer science username.


